Info, tips and guides
Bugs
Documents
FAQs
Links
Where to buy
Downloads
TAPs
Linux tools
Mac tools
Windows tools
Toppy firmwares
Search
Forum FAQs
Forum index
Forum search page
Tools
Toppy.org.uk

TF5800 manual: viewing your schedule
Viewing your recording schedule
Once you’ve scheduled a number of recordings, you’ll probably want to see which programmes you have added to your schedule, or you may even want to remove an entry from your list, without having to look through the EPG to find them all.
To see the recording schedule, press the Menu button ![]() to
display the PVR’s main menu, and then select Recording. On the recording
menu, choose the last option, Timer setting, and you’ll see this:
to
display the PVR’s main menu, and then select Recording. On the recording
menu, choose the last option, Timer setting, and you’ll see this:
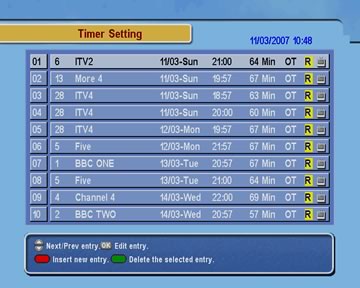
As you can see, the list shows the date, time and duration of the recordings that you’ve scheduled, together with the channel number. The symbol at the right shows whether a recording is for a TV or a radio station, and just to the left is an abbreviation for whether or not a recording is repeated; it will show OT for one time, WL for weekly, WD for weekdays and WE for weekends.
If a recording is scheduled to repeat, the time and date in the list will be the next time the recording will take place.
To see more details of a recording, highlight it with the arrow keys and then press OK. As you can see, this is the same screen as the one that appears when you edit the details of a recording from the EPG, and it works in just the same way.
If you’d like to delete a recording from the schedule, simply move to it and press the Green button on the remote control
Press Exit to return to viewing from the recording schedule.
Scheduling a recording without using the EPG
The programme information that’s broadcast with digital TV signals usually covers a week’s worth of programmes, but sometimes there are technical errors that mean it doesn’t go that far into the future, or perhaps you’ve heard about a programme that’s on next month, and you want to schedule a recording while you remember.
It’s very easy to do – you can create a scheduled recording without using the EPG. First, you need to access the recording schedule in the way we’ve just described.
Then, press the Red button on the remote control to create a new entry. You’ll see a screen like this appear:

Make sure the Record option is On, and then move down to the next option and choose whether you want to record a TV or a radio channel.
On the next line, you can use the left and right arrows to move through the channels, or press OK to see the list, then move to one and press OK.
Next, select the mode – how often the recording will be made, for example daily, weekly, or just one time. On the next line down, use the arrow keys to pick the date for the recording.
The start time will automatically be set to the time when you began creating the timer; you can either change it with the arrow keys, or just type in a time, using the 24 hour clock, for example 1745 for quarter to six in the evening.
Below the start time, set the duration, and then simply move down to the OK line, and press OK. The PVR will automatically give your recording the name of the programme that’s being broadcast when it starts.
If you’d like to choose your own name for a recording, you can enter one using an on-screen keyboard, by changing the Filename option. We’ll explain more about advanced features such as this later on in the manual.